


Microchip Technology Pressure Demo with AVR64DD32
Microchip Technology Pressure Demo with AVR64DD32 demonstrates the integrated Analog-to-Digital Converter's (ADC) responsiveness as it lights up LEDs based on applied pressure. The pressure reading can also be sent by a UART interface that allows real-time observation of the pressure data locally. The AVR64DD32 is equipped with core-independent peripherals (CIPs) like ADC and UART functionalities. The LEDs illuminate, reflecting the magnitude of the ADC-derived value. To ensure a seamless reading experience, the ADC internally employs a smart filtering technique, gathering 16 measurements and providing the average for a smoother and more precise result.
Applications
- Human-machine interface
- Industrial control
- Home appliance products
- Internet of Things (IoT)
Setup
Configuration
Configure the software using either a pre-compiled binary or manually configure everything.
Option #1
Easy setup - upload the pre-compiled binary
• Download the repository
• Drag-and-Drop program the AVR64DD32
• Plug Curiosity Nano into Windows®, and it will appear under File Explorer
• Put the .hex file (in the dist folder) into the Curiosity Nano folder in File Explorer, and it will automatically program itself
Once the steps above are completed, continue to the Operation Section to see how to operate the demo.
Option #2
Setup from scratch - everything is manually configured, except for the main.c and the driver files for the 4x4 LED grid: RGBClick_4x4.c and RGBClick_4x4.h.
Step #1: Create a project
• In MPLAB X, select File → New Project → Microchip Embedded → Standalone Project
• Device: AVR64DD32 (plug-in Curiosity Nano) Tool → AVRDD64DD32 Curiosity Nano SN
• Compiler Toolchain → select any XC8 compiler (v2.36+)
• Select the project name/location, and click finish
Step #2: Setup MPLAB Code Configurator (MCC)
• Launch MCC by clicking the blue "MCC" shield at the top toolbar → Select MCC Melody → Finish
• (If MCC is missing from the toolbar, install it by going to Tools → Plugins → Available Plugins → MPLAB Code Configurator → Install)
• After configuring the ADC, UART, and pin configuration in MCC, main.c and RGBClick_4x4.c will handle everything else
Analog-to-Digital-Converter (ADC)
• Add the ADC to the project
• Select Device Resources → Drivers → ADC → + ADC0
• Once the ADC is added, modify the following sections
Related Documentation
• AVR64DD32 Datasheet
• AVD64DD32 Curiosity Nano Hardware User Guide
• Curiosity Nano Base Board Hardware User Guide
Software Used
• MPLAB® X IDE 6.0.0 or newer (MPLAB X IDE 6.0)
• MPLAB XC8 2.36.0 or newer compiler (MPLAB XC8 2.36)
• MPLAB Code Configurator (MCC) 5.1.9 or newer (MPLAB Code Configurator)
Hardware Used
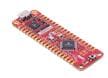
• AVR64DD32 Curiosity Nano (EV72Y42A)
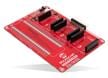
• Curiosity Nano Base for Click boards™ (AC164162)
• Mikroe 4x4 RGB Click
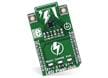
• Mikroe Force Click

ADC Configuration Explanation
Sample Accumulation Number (SAN)
The SAN takes multiple samples before reporting a result, reducing the outliers' effect to create a more stable result. Sixteen samples are used, instead of more, because that is the maximum accumulation size amount (16-bits) the AVR64DD32 supports for a 12-bit reading. (Max 12-bit reading = 2^12 = 4096) * (16 readings) = 65536 = 2^16, which is the size of the accumulation register.

From the AVR64DD32 datasheet page 491
Left Adjust Result
• The 12-bit value read is stored in a 16-bit register and either left- or right-justifies the result
Free Running Mode
• Automatically starts the next ADC conversion after the last one is finished
Positive Input Selection
• As shown in the picture below, the Force Click's Analog Pin, AN, is in the top left position
• Since it is in the Curiosity base board's slot 2, that corresponds to the Curiosity Nano base board's 13th pin
• On the AVR64DD32, the 13th pin is PORTF3, also known as AIN19, thus Analog input 19

From Curiosity Nano Base Board Hardware User Guide page 5 and AVD64DD32 Curiosity Nano Hardware User Guide page 25
Universal Asynchronous Receiver-Transmitter (UART)
• Device Resources → Drivers → UART → + UART
• Set UART PLIB Selector to USART0

• In the builder window, click USART0_Peripherals, enable Printf Support

Pin Configuration
• Set pins in Pin Grid View
• ADC0 → PORTF3
• Pins, GPIO Output → PORTD7
• USART0, TX → PORTD4
• USART0, RX → PORTD5

• Modify Pins
• Project Resources → System → Pins
• Set the name of pin PD7 to RGB_LED
• Change the Input Sense Configuration for the ADC0 pin to the Digital Input Buffer disabled

Step #5: Generate the project
• Click the generate button in MCC by the Project Resources window to create the MCC-generated header and source files
Now close MCC by clicking the blue MCC shield again
Step #6: Adding main.c, RGBClick_4x4.c and RGBClick_4x4.h
• Insert the .c and .h files into the Project
• Copy main.c, RGBClick_4x4.c, and RGBClick_4x4.h into project directory
• Add the files to the project
• Under the projects tab, right-click source files → add existing item → main.c, RGBClick_4x4.c
• Right-click header files → add existing item → RGBClick_4x4.h
Make and Program Device
• Right-click project name → Make and Program Device
Operation
On boot, the array will strobe random colors, green, then red, before turning off. This operation will verify the LED array is connected and configured properly.
When the resistor is pressed, the LEDs should light up proportionally to the applied force. When the resistor is 100% pressed, the lights will strobe through various colors.
To view the pressure the resistor reports, open MPLAB Data Visualizer from the toolbar (The green shield with DV). Under connections, select the COM port the Curiosity Nano is connected to and hit play. Under the terminal input, select the same COM port. The pressure should now be displayed on the terminal.

Summary
This demo showed
- Using the advanced capabilities of built-in peripherals on the AVR64DD32, such as the ADC
- Configuring peripherals inside of MCC to quickly set up a new microcontroller project
- Connecting a Force click and 4x4 RGB Click to a Curiosity Nano Base Board
- Utilizing MPLAB Data Visualizer for viewing UART streams instead of requiring a 3rd-party program
On The Board

Microchip Technology AVR64DD32/28 8-Bit Multi-Voltage I/O MCUs
28- and 32-pin MCUs with multi-voltage I/O, ideal for sensor applications and IoT end nodes.

Microchip Technology MCP1826/MCP1826S Low Dropout Linear Regulator
1000mA linear regulator that provides high-current and low-output voltages.
Videos
Related Products
Microchip Technology AVR64DD32 Curiosity Nano Evaluation Kit (EV72Y42A)
Designed to evaluate AVR® DD microcontrollers, supported by both MPLAB® X IDE and Microchip Studio.
Microchip Technology Curiosity Nano Base for Click Boards™ (AC164162)
Designed to ease the connection between Curiosity Nano Kits and Mikroe Click Boards™.
Mikroe Display Click Boards
Allow for adding LCD, OLED, and various other display options for applications and designs.
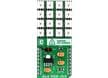
Mikroe MIKROE-1881 4x4 RGB Click
Matrix with 16 smart RGB elements, creating a 4x4 display.
Code
- MPAE-14592: added CI support and readme
- MPAE-15753: updated compiler and DFP
- MPAE-15753: removed Pro configuration
- MPAE-14592: removed image width modifier, adjusted image sizes
- MPAE-14592: read me image tweaks
- MPAE-14592: added STL
- MPAE-14592: added CI support and readme
- MPAE-14592: removed image width modifier, adjusted image sizes